0 How to Styling the blog date header

A reader asked: " I really want to make a different date header!"

Well this can be done via editing the CSS (Cascading Style Sheet) in the template. Note that before making changes to the template best to first backup the blog template (Dashboard > Design (previously called LAYOUT) > Edit HTML >Download Full Template).

Now in the template editor, look for h2.date-header (use ctrl+F) which may be like the following:

h2.date-header {
margin:1.5em 0 .5em;
}

You can ten add in specifications for fonts and colors, example:

h2.date-header {
margin:1.5em 0 .5em;
font-family:"Times New Roman", Times, serif;
font-style:italic;
font-size:125%
color:red;
}

or whatever you wish. For more details, refer to W3schools: CSS Fonmt

0 Make Money By Forex Trading

Forex (foreign exchange market) is the world largest financial market which exchange 4 trillion dollars per day. The New York Stock Exchange only exchange a volume of $153 billion a day. That means this is a huge financial market and this is actually a interbank network.


With the advancement of the technology the currency trading has become more and more popular topic throughout the world. Now people can trade currencies even by staying at their homes by spending few hours on internet. The concept of currency trading as follows.

In Forex market you will exchange currency as pairs (EUR/USD). You buy or sell currency as pairs. Then you will predict whether the exchange rate will increase or decrease. If your prediction is correct you will have profit, if wrong you will loose money. Pretty cool, isn’t it. But you need a comprehensive knowledge on Forex indicators to determine the market behaviour and liquidity. Otherwise you will fail definitely.

Because of the Forex brokers who have given you ‘demo accounts’ with virtual money to practice under real market rates, you don’t want to loose your own money during your practice period. Then you can practice with virtual money until you get descent winning ratio. After that you can join with real money to earn for real. Some Forex brokers are used to hold challenges with virtual money. The people who learn highest profit with virtual money is granted by real money. By this way you can earn money without loosing any.

For Forex trading the only equipment you need is a computer and a high speed internet connection. Then you should download a Forex broker platform. There are thousands of Forex brokers throughout the world. At the same time I want to stress you this a highly profitable trading and this is not a scam. But you need to learn it carefully.

0 How to Get Approved For Google Adsense Fast

Earning good amount of wealth every blogger surfer think but it can be true if they invest their little time their mind and really want to make money so expose their quality to Adsense team so they must get approval through Adsense.

Real Names and information.

As the blogger goes for apply to the adsense it ask for registration so i suggest you must fill up your real information like your name your real information address and ph.no etc. 

Apply One time

If you have applied for adsens must be remember never applied again till you get the reply mail from adsense if your blogger select than you will get a confirmation mail otherwise they send a rejection mail to you.only ther rejected blogger can apply again.


Blog Has Good Content 

There should be a good content  in your blog so check yous blogger quality and quantity both are must be pure and also post your content at the daily basis like 3-5 post per day.

Good Traffic

The traffic should be hit at your blogs as many traffic increase to your blog that will be good for you to get approval fast so always submit your blog/website as many directory website like Google,Yahoo,Bing,Ask etc.you can also submit yur blogs  to many articles website.

Make Your Site Look Professional

A blog must be professional for making your blog professional follow these few step surely these step helps to you.
 
  1. Use light colors.
  2. Upload simple Template.
  3. Add links to all your important pages.
  4. Ensure easy navigation.
Be remember this tips for getting fast approval.
All the Best

0 Simple adjustable way to hide Navbar

An email from a blogger regarding his problem with hiding the navbar caused me to revisit the hiding the navbar issue plus recheck the Blogger TOS (Terms of Service) plus discovered a very simple way to hide the navbar which I tested at A-Z Products and adapted from Disable/hide navbar.

In order to hide the Blogger navbar, all you have to do is to sign into Blogger dashboard, click LAYOUT then EDIT HTML to open the template editor. Look for the body section in the stylesheet which in the standard Blogger Minima template is as follows:

background:$bgcolor;
margin:0;
color:$textcolor;
font:x-small Georgia Serif;
font-size/* */:/**/small;
font-size: /**/small;
text-align: center;
}


Now all you need to do is to copy and paste this small bit of CSS

margin-top:0px;
position: relative;
top: -40px;


and paste it, say, at the bottom of the above script just before the last } like this:

background:$bgcolor;
margin:0;
color:$textcolor;
font:x-small Georgia Serif;
font-size/* */:/**/small;
font-size: /**/small;
text-align: center;
margin-top:0px;
position: relative;
top: -40;

}


Depending on your template, you can play with the variable -40 until the extreme top of your blog header sits right at the top of the browser window or at any position according to your desire. To illustrate, see the screen shots below showing the original, the appearance with the variable as -50, then -40:

original appearance navbar with Minima template
Original appearance with standard Blogger Minima template with Blogger Navbar plus space visible


navbar plus part of Header hidden
Blogger Navbar plus part of Header hidden


Blogger Navbar hidden and no space above blog Header

Update: A commentator commented that the comments of J and Carol helped him, I think, with the new Blogger Template Designer, so I figured I will add their comments into the post proper:

For those using the new Template Designer, go to Design - Template Designer - Advanced - Add CSS.
Paste this code:

div.navbar {
opacity:0.0;
display:none;
}
body
{
margin-top:0px;
position: relative;
top: -50px;
}

Curse Blogger for making me spend two days on this!!!!

0 Blogging tip - search definition (general)

I plan this to be a series of tips and tricks for blogging in general, not only related to Blogger.com platform, but applicable for any blogging software including Wordpress, Live Journal, Jomlah, etc.

I will start off by one simple little search engine trick I often use. Frequently, I like to define some word before writing about something related to that word. What I will do is just to type the word "define" before the word in a search engine.

For example, I want to publish a post about diabetes. Searching for [define diabetes]. Further, you can use different search engines depending on what kind of results you want.

If you use Google.com, the very first result will usually be the Web definition:

Web definitions for diabetes
a polygenic disease characterized by abnormally high glucose levels in the blood; any of several metabolic disorders marked by excessive urination ...
wordnetweb.princeton.edu/perl/webwn - Definition in context


If you use other search engines, the first result will not be as consistent. For example, using bing.com, first result was from www.diabetes.org:

American Diabetes Association Home Page - Aerican Diabetes ...
The American Diabetes Association is leading the fight against the deadly consequences of diabetes and fighting for those affected by diabetes.
www.diabetes.org Cached page


but the first result for asthma was from

Asthma UK - Homepage
Asthma UK is the charity dedicated to improving the health and well-being of the 5.4 million people in the UK whose lives are affected by asthma.
www.asthma.org.uk Cached page

0 Cannot add gadgets with template designer? - solution

A blogger who was unable to add gadgets when in design (clicking on "add gadgets" takes me the blogger back to my dashboard page). Also, if he try from layouts, thru new template designer, all options are deactivated.

The blogger solved his problem quite simply in the end:
(1) adopted new template, and
(2), changed to mozilla firefox browser... "add gadgets" got enabled again...

Well if you have a similar problem, perhaps his experience can help you solve the problem

1 How to get comment and post notification email sent to all team member

In Blogger, there is provision for email to be sent to you whenever someone leaves a comment on your blog. To set this, in the Dashboard, go to SETTINGS > COMMENTS and fill in the email address at the box for COMMENT NOTIFICATION ADDRESS. There is also a provision for an email to be sent whenever a post is published. Go to SETTINGS > EMAIL and fill in the email address at the box for BLOGSEND ADDRESS. However, only 1 email address can be filled in for either post or comment, so if you have a team blog, and each team member want to be notified, you have a problem. Here is a workaround.

Set up a Yahoo group specially for the blog. When setting up the group, there is a provision for entering your group email address. This email address is for your group. When you send a message to this address, all members of your group will receive a copy. For example, I may set the group email address as blogger-tricks@yahoogroups.com. Configure the group so that posts are sent to all members. Then fill in this address for the Blogger COMMENT NOTIFICATION ADDRESS and BLOGSEND ADDRESS. Now, whenever someone makes a comment or publish a post, an email will be sent to blogger-tricks@yahoogroups.com and Yahoo group will in turn send an email to all members of the group.

0 Creating categories step-by-step

1. Create a del.icio.us account (see Introduction to del.icio.us). Even if you already have an existing del.icio.us account, creat another one specially for setting up the categories. For the user name, I would suggest using part of the blog's url or title. For example, the user name I selected for doing the categories for this blog is bloggertricks.

2. If you are using FireFox (highly recommended), install the del.icio.us extension with the "My del.icio.us" and "Tag this" buttons (see screen shot below:
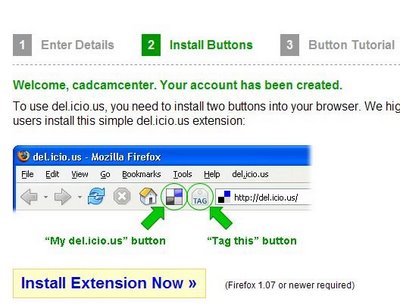
Click the "Install extension now" button and follow the instruction. This will install 2 buttons into the toolbar.

3. Click the "My del.icious" button. Confirm that you are logged in. If not, then log in.

4. Surf to the main page (index page) of your blog. At the PREVIOUS POSTS section of the sidebar, click on the very first post. This will take you to the individual post page (permalink) of that post, and the PREVIOUS POSTS will then display the next 10 previous posts. Click the "Tag this" button. A pop-up will open with the url, a description, and boxes for you to enter notes and tags. Enter one-word tags for the category you want that post to be in. If the category is more than 1 word, join them with a hyphen or underscore. For example, for my post entitled "Hiding the navbar", since the post is specific to Blogger, I will tag it with "Blogger-specific" (minus the quotes). You can enter more than 1 tag for each post, the tags just have to be separated by a space. Click [save] when you are done.

5. At the PREVIOUS POSTS section in the sidebar, click the next post, which will take you to the individual post page of that post. Click the "Tag this" button again, and tag that post

6. Repeat for the subsequent post until you have tagged all the posts.

Now, you will have to decide which of the methods you want to use - the Easy Method, or the Simple Method. For an example of the Easy Method, surf over to Natural Remedies to see what it is like. The categories created for this blog Blogger Tips and Tricks is an example of the Simple Method. For the Easy Method, go to step 7. If you want the Simple Method, go to step 9.

Easy Method

7. Click the "My del.icio.us" button. At the top right-hand corner of the My del.icio.us homepage, click HELP, then under BLOG INTEGRATION, click TAG ROLLS. Adjust the settings until the appearance of the tag roll you see in the PREVIEW on the right is what you want. I suggest you change the TITLE to Categories or something suitable.

8. If the appearance of the categories (tag roll) in the preview window on the right is what is desired, click on the code box at the bottom of the page to highlight it, right-click and copy (or ctrl+C). Preferably in another tab or window, sign into Dashboard, select the blog, click the TEMPLATE tab to open the template editor and paste the codes into your template in a suitable place.  Done.

Simple Method

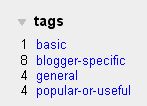
9. Click the "My del.icio.us" button. This will take you to the "homepage" of your del.icio.us account. On the top right corner, you will see the tags you have created.10. Click on one of the tag (for example, BASIC). This will take you the the del.icio.us page that contains all the links to the posts that was tagged with the category BASIC. Highlight the url in the address bar of that page, right-click and copy. In this example, the url will be http://del.icio.us/bloggertricks/basic.

11. Decide on a suitable place where you want the categories displayed . This will normally be in the sidebar. Open a new window (or tab) and sign into Dashboard, select the blog, click the TEMPLATE tab, and in a suitable place in the template, enter the following code:
<h4>CATEGORIES</h4>
<a href="X">A</a><br />
<a href="Y">B</a><br />
<a href="Z">C</a><br />
where X is the url you copied from step 10, and A is the text of the tag, in this example, BASIC.

12. In the previous window, go back to the My del.icio.us homepage, click on the next tag. In the above example, it will be BLOGGER-SPECIFIC. At that page containing all the links to the posts that are tagged with that category, again copy the url, replace Y with the url, and B with the second category. In the above example, the codes will become
<h2>CATEGORIES</h2>
<a href="http://del.icio.us/bloggertricks/basic">basic</a>
<a href="Y">B</a>
<a href="Z">C</a>
(Y and B have been left as it is in the above example as putting in the real url will make the code extend beyond the gray box, but I hope you get the idea)

13. Repeat step 12 for the third category

14. If there are more categories, just add more hyperlinks and repeat the steps.

15. When all the categories hyperlinks are done, preview, and if satisfied, save and republish. Done.

0 How to Add content via the template

blogger template 1
blogger template 2
blogger template 3

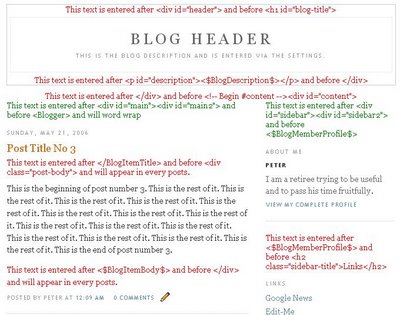
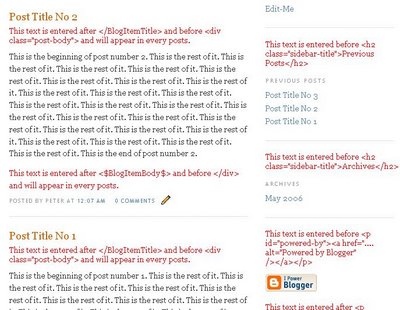
Content can be added to the blog in 4 ways - via the settings (sign into Dashboard, select blog, click SETTINGS > BASIC, then fill in the box for the TITLE and DESCRIPTION), editing the profile, posting, and via adding stuff to the template. In this post we will deal with the fourth one. What kind of stuff can be added via the template? Text, hyperlinks, images, HTML and javascripts for advertisements, hits counter, guest book, etc. The screenshots above show text added, but adding other stuff should be no problem. In which part of the template you place the stuff will depend on which part of the web page you want the stuff to be in. As a guide, I have added text in various sections of the template, and the positions they appeared are displayed in the screenshots above. The text are in red (and green) and are pretty much self explanatory.
The most common place to add stuff via the template is the sidebar. For this you will have to add the stuff between
<!-- Begin #sidebar -->
<div id="sidebar"><div id="sidebar2">

and
</div></div>
<!-- End #sidebar -->
.
To give you additional navigational aid, there is a button on every blogspot page. Stuff added before or after the following codes
will appear before or after the button respectively.

0 How to copy features from websites you like

You may come across websites or blogs you like, and you will like to have some of the features you see there. What do you do? Well, the idea is to look at the source codes of the website. At the menu bar, click View > Page Source (FireFox) or View > Source (Internet Explorer) and a window will open with the source codes of the site you admire.

For example, I came across a website which has a CATEGORIES section in its sidebar at I want to be a millionaire.


and in the source codes I look for the text Millionaire Categories. The checking turns up this block of codes:


Click on the screenshot to enlarge it

This revealed that the site is just using del.icio.us and hyperlinks to create his CATETORIES section, and it gave me the idea for a simple method for doing categories for my sites, and also is the inspiration for doing the post Blogger Categories: A Simple Method.

0 How to Put the archive links into a menu

If you have been blogging over a long period of time, the list in the archives can get pretty long. You can put the links into a menu to make it more compact. It is pretty straight forward to do. All you have to do is to replace the default archive code with another set of code.

In your template, look for the default archive code which is shown below:

<h2 class="sidebar-title">Archives</h2>
<ul class="archive-list">
<BloggerArchives>
<li><a href="<$BlogArchiveURL$>"><$BlogArchiveName$></a></li>
</BloggerArchives>
delete them, and replace it with these codes:

<select name="archivemenu" onchange=
"document.location.href=this.options[this.selectedIndex].value;">

<option selected>- Archives -</option>

<BloggerArchives>
<option value="<$BlogArchiveURL$>"><$BlogArchiveName$></option>
</BloggerArchives>

</select>
and that is all there is to it. It is done.

Note: I have a nagging suspicion that if this hack is implemented on your blog, you may not be able to backup your blog right up to the beginning with Blog Collector. See How to backup your blog. Also, drop-down menu cannot be read by search engines, so it may not help you in search engine results.

0 How to change the width of the content and the sidebar

This is a common request of bloggers using some of Blogger standard templates when they see wide spaces on either side of the main and side column, like what you will see in this blog if viewed with a large screen. This is to take into consideration those with small screens. If you want to see how this page will display in a 800x600 resolution, type or copy-paste this into the address bar: javascript:top.resizeTo(800,600). You will see what others with small screen see, and there are will wide spaces. If you change the width of the content column and sidebar, it will look different to those with different screen resolution. It may involve a lot of scrolling to see other parts of your blog, and the less patient ones may pass your blog by. Anyway, if you still want to change the width, the instructions are below:

If you want to change the width of the content and the sidebar, you will have to modify the style sheet. This is based on the Blogger Minima template. Look for the following block of codes:

/* Content
----------------------------------------------- */
@media all {
#content {
width:660px;
margin:0 auto;
padding:0;
text-align:left;
}
#main {
width:410px;
float:left;
}
#sidebar {
width:220px;
float:right;
}
}


Note that the sum of the width of the main column (410px) and the sidebar (220px) is less than the total content (660px). You may change the width to whatever you fancy so long as you keep the sum of the width of the sidebar and the main column to be less that the total content. For example, you may change the width of the total content to be 800px, the main column 500px and the sidebar 270px, and your style sheet will become as follows:

/* Content
----------------------------------------------- */
@media all {
#content {
width:800px;
margin:0 auto;
padding:0;
text-align:left;
}
#main {
width:500px;
float:left;
}
#sidebar {
width:270px;
float:right;
}
}


You may also want to change the width of the header as well, as follows:

/* Header
----------------------------------------------- */
@media all {
#header {
width:800px;
margin:0 auto 10px;
border:1px solid #ccc;
}
}


BTW, if you want to see the effect that this change will have on viewers with 800X600 screen resolution, you can type javascript:top.resizeTo(800,600) into the address bar to resize the window to 800x600.

Reminder: Always backup the template before you make any changes to it.

0 How to make permalink more prominent

What is a permalink?

If you have enabled POST PAGE, then each individual post of your blog will have an individual post page with its own URL. If you are using the default settings for your blog, you will see at the bottom of every posts a line "Posted by (author) at (time stamp)" as illustrated in the screen capture below:

If you let your mouse hover over the time stamp, a pop-up will appear with the text "Permanent Link", and if you click on the time stamp, you will be redirected to the individual page of the post. This is good for your blog as people who want to refer (and link) to this particular post will be able to do so. However, this default setting have the disadvantage that the permalink is not prominent and is not easily noticed. Many are not even aware that the time stamp is a permalink. There is an easy way for you to make the permalink more noticible by adding the text "PERMALINK", as shown in the screenshot below:

To do this, you will have to look for this block of codes in your template:

<a href="<$BlogItemPermalinkUrl$>" title="permanent link"><$BlogItemDateTime$></a>
and add the text PERMALINK after <$BlogItemDateTime$>, like this:

<a href="<$BlogItemPermalinkUrl$>" title="permanent link"><$BlogItemDateTime$> PERMALINK</a>

0 Blogger (classic template) Expandable Post Summary

What is Expandable Post Summary?

You may be in the habit of creating long posts, and your readers have to scroll and scroll to get to the next post in the main or archive section. You don't want that. You want only to have the first few lines of the post visible, followed by a READ MORE hyperlink that takes you to the full post. That is expandable post summary.

How to do expandable post summary for Blogger

First, you have to ensure that you have POST PAGE enabled. Go to SETTINGS > ARCHIVING and make sure that ENABLE POST PAGES? is set to YES. Then paste the following codes into your CSS (Cascading Style Sheet. It will be the section between the <style> and the </style> tags in beginning of your template.) (Important note: It is always advisable to backup the template before you do any modification to it.)

<MainOrArchivePage>
span.fullpost {display:none;}
</MainOrArchivePage>

<ItemPage>
span.fullpost {display:inline;}
</ItemPage>

Then add the following codes in the template just after the <$BlogItemBody$> tag

<MainOrArchivePage><br />
<a href="<$BlogItemPermalinkURL$>">Read more!</a>
</MainOrArchivePage>

You can replace the anchor text Read more! with Read the rest of the post... or whatever you fancy.

The next thing you have to do is to place some pieces of codes in your post. Put the tag <span class="fullpost"> at the spot where you want your long post to be truncated, then type in the rest of the post. At the end of the post, add the tag </span>. Thus your post may be typed as follows:

This is the beginning of a long post, which is truncated here. <span class="fullpost"> This is the rest of the long, long post. </span>
If you don't want to have to type in the codes by hand each time you do a post, you can add the codes in the post template by going to SETTINGS > FORMATTING and at the bottom of the page, in the POST TEMPLATE box, add in the codes <span class="fullpost"></span>. Just make sure that the text are typed in the proper place.

0 how to Hide the navbar

Update 24 May 2007: A blog visitor complained that the instruction didn't work for him. This post was written before New Blogger was introduced and perhaps it wouldn't work for New Blogger. If you are using New Blogger template, refer to How to hide navbar for New Blogger

Update 24 October 2006. Some people have very stong opinion about the hiding of the navbar as it violate Blogger TOS (Terms of Service). They feel that Blogger is asking very little of bloggers in return for providing this free service. Please read the rest of this post with that in mind. And be reminded that there are advantages of having a navbar at the top of your blog. However, many people are wary of the Next Blog link in the navbar which takes to to random Blogger blogs, some of which may contain explicit sexual content, hate messages, etc. Some educators who want to set up blogs for their students are understandbly wary of this and want to remove the navbar, and I can understand why.

The navbar is the bar at the top of every blogspot.com blog that contains from left to right, the Blogger logo, a search box, Search This Blog, Search All Blogs, Blog This!, Get Your Own Blog, Flag, Next Blog. It is by default dark blue in color, but it may have been changed to tan or some other color.

Many bloggers for some reasons or other want to hide this navbar. To hide the navbar, try adding this code in between the <style></style> tags, in the <head> section.

<!--Code to remove blogger navbar-->
#b-navbar {
height:0px;
visibility:hidden;
display:none
}
<!--End of code to remove blogger navbar-->

However, here are some reasons why one should keep the navbar. For one, I believe the navbar is required as per Blogger's Term of Service. Another is to allow visitors to navigate around your blog by using the blog search box at the top left-hand corner. In fact, on my blog, I have 2 search boxes, one in the navbar and one Google sitesearch box. I have noticed that the search results from the 2 boxes differ. One search result may turn up a relevant topic when the other one fails to do so.

0 Hoe to Take the backup of your blogger's all post

This is for your safe purpose if by mistake or any reason your post goes deleted and there are no option you have so just learn how to take your all posted backup in your computer regularly and restore your post in case your post deleted and you can also transfer your post to another blogger easly with your post backup.


Step to take backup your post:


1. Log in your blogger.

2. Click on the Setting and than click on Basic tab.


3. There you will see the three Blog Tools :Import blog - Export blog - Delete blog.

4. Select the Export blog tag for taking backup of your all post. 


5. After Clicking Export blog tag you will get next page to Download blog.
 
6. Choose the location where you want to take backup of your blogger with post.


0 How to Hide Post Date, Time and/or Author

There are some reason for blogger to hide Post date, time and author. May be they want to see their blog looks clear or everything? Now I will show you the trick to "hide your post date, time and or author". The methods are very simple, just find the code that I pointed to you and delete it. You can chose which part want to delete, date only, time only, author only or it all. Ok, if you decided to do it lets begin the hack.

1. Login to blogger the go to "Layout --> Edit HTML"
2. Click on the "Download Full Template" to back up your template first.
3. Check on the "Expand Widget Templates" check box.


Hide Post Date

find this code and delete it.

<data:post.dateHeader/>

Hide Post Time


find this code and delete it.


<span class='post-timestamp'>
<b:if cond='data:top.showTimestamp'>
<data:top.timestampLabel/>
<b:if cond='data:post.url'>
<a class='timestamp-link' expr:href='data:post.url' rel='bookmark'
title='permanent link'><abbr class='published'
expr:title='data:post.timestampISO8601'><data:post.timestamp/></abbr></a>
</b:if>
</b:if>
</span>

Hide Post Author


find this code and delete it.


<span class='post-author vcard'>
<b: if cond='data:top.showAuthor'>
<data:top.authorLabel/>
<span class='fn'><data:post.author/></span>
</b:if>
</span>


Thats all.

0 How to Add A Paypal Donate Button to the Blogger

Adding a Paypal donation button to your blog will give your loyal readers a chance to support


1.First,Log in to your Paypal account.
2.Click on the 'Merchant Services' tab (see at the top of the page).
3.Scroll down the window and you will see an option "Donations" in the right sidebar.Click on it!
4.Now,you will see some options like Donation name/service ,donation id,etc etc...
The first field (Donation name/service) is the only thing that is required and all the remaining fields are optional.
Enter that first field,choose a button style,scroll down the window and click on "Create a button Now"
5.Now,you will see some html code... Copy it and sign in to your blogger dashboard »» Click on the layout »» Add a Page element »» html/javascript »» and paste that html code and SAVE THE CHANGES.

Here is how the button will look in your sidebar

0 How to make Sidebar slide to the bottom of the page

A very common complaint of bloggers is the sidebar, and sometimes the content (main column) of the blog sliding to the bottom of the page. Sometimes this happen in all the browsers, sometime in one browsers and not the others. This happen most frequently in Internet Explorer. I have previously published post about the same problem at Sidebar pushed to the bottom of the page. Here I try to explain further what to do about it.

Images and hyperlinks

The most common cause of this problem is having photos or hyperlinks that are too wide/long for the width for the main column or the sidebar. Try saving the post containing the photo or hyperlink suspected of causing it in draft form, and see if that helps (see update below colored in red for a better way). If it does, removing the post or reducing the size of the photo will help. If you are not familiar with manipulation of images, read this post: Uploading and manipulating images with Blogger and Blogger Beta (click "BACK" button to get back to this page).

Update: I found that a better way is to look at the individual post page by clicking on the timestamp (permalink) at the bottom of the post, or by clicking on the title of the post in the Previous Posts section of the sidebar. If the sidebar is where it should be - at the top of the page, then that post is innocent and you should leave it alone. If the sidebar is at the bottom of the page, then it is that post that is causing the problem and you need to do something about it. With this method, you need not go to trouble of saving it in draft, and then publishing it again)

If it is a long hyperlink, reduce the anchor text to a short text. Some people are fond of writing the HTML for the link like this: <a href="URL">URL</a>. If the URL happens to be a long URL, then you will end up with a very long unbreakable link which will cause your sidebar to slide down to the bottom of the page. Write your HTML for the link this way:
<a href="URL">description</a>

Tracking down the problem

You may also try doing some detective work. Think back to what you did just before it happened. Undo it and see if that helps. You may want to try to track down what is causing the problem. You may try looking at each individual post page and see if the problem occurs. (see update in red above). Try to check to see if the problem is with the template (see below)

Template

Sometimes the problem is caused by incorrect codes or missing or mismatched tags in the template. Rat reported that once it was caused by a closing comment tag --> without an opening comment tag <!--. HTML tags occurs in pairs - opening tags and closing tags.

If you want to see if the fault is in the template, first BACKUP your template. If you don't know how to backup the template, read post How to backup your template (close new window to get back to this page). Then load a fresh template to see if that helps. If the sidebar is at the bottom, then it has something to do with the template. Use a new template, and if you have a lot of customization, lessen your workload by copy-pasting the customizaton from your backup template. If don't want to start all over again, put back the backup template and try to locate the problem, If you can't, then post your problem to the Blogger Help group (close new window to get back to this page) and see if anyone can help.

Others

Another way to solve the problem is to change the width of the content and the sidebar. When you do this, you have to keep in view how it will affect the way the blog is displayed in different screen resolutions. Read about how to change the width of the content and the sidebar in this post: How to change the width of the main column and the sidebar (click "BACK" button to get back to this page). If you are using a large screen, and you want to check how those with 800x600 screeb resolution see your blog with the changes, type or copy-paste this into the address bar - javascript:top.resizeTo(800,600) and press the enter key.

Sometimes it is caused by you, and sometime, as I discovered earlier, it can be caused by people commenting in your post, putting long unbroken text or codes. That had happened to me twice. It was most embarassing for me as I have this post which is about how to solve sidebar at the bottom of the page problems, and I wasn't aware of the problem for a long time. Most of the time, I use FireFox with Google toolbar (close new window to get back to this page), and that problem only was seen in Internet Explorer. I was thus unaware of it for a very long time.

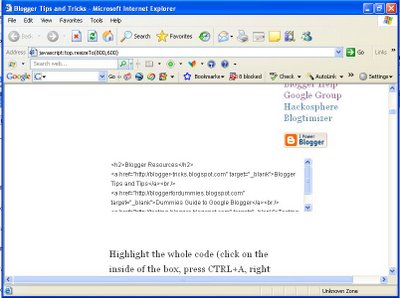
I very often have to include example of HTML codes which contain long unbroken text/code, and in order to do that, I have to put them into a scroll box. If you want to know how to include a scroll box, have a look at post How to make a scroll box (click BACK button to get back to this page). This can be another source of problem because I have to decide on the width of the scroll box to fit into main column. In one of the blog, I used a modified Thur's 3 column Minima template (click BACK button to get back to this page). I use a large screen. In that problem post, I had chosen a width for the scroll box which easily fit into the main column in that screen resolution, but recently, I discovered that for those using 800x600 screen resolution (about 10-20% of my readers) the page was screwed up. See screenshot (click to enlarge)
scroll box causing problem for small screen viewers
That was for this blog. I think I will change back to the standard Blogger template.
 

Get Everthing Copyright © 2011 - |- Template created by O Pregador - |- Powered by Blogger Templates