1 How to get comment and post notification email sent to all team member

In Blogger, there is provision for email to be sent to you whenever someone leaves a comment on your blog. To set this, in the Dashboard, go to SETTINGS > COMMENTS and fill in the email address at the box for COMMENT NOTIFICATION ADDRESS. There is also a provision for an email to be sent whenever a post is published. Go to SETTINGS > EMAIL and fill in the email address at the box for BLOGSEND ADDRESS. However, only 1 email address can be filled in for either post or comment, so if you have a team blog, and each team member want to be notified, you have a problem. Here is a workaround.

Set up a Yahoo group specially for the blog. When setting up the group, there is a provision for entering your group email address. This email address is for your group. When you send a message to this address, all members of your group will receive a copy. For example, I may set the group email address as blogger-tricks@yahoogroups.com. Configure the group so that posts are sent to all members. Then fill in this address for the Blogger COMMENT NOTIFICATION ADDRESS and BLOGSEND ADDRESS. Now, whenever someone makes a comment or publish a post, an email will be sent to blogger-tricks@yahoogroups.com and Yahoo group will in turn send an email to all members of the group.

0 Creating categories step-by-step

1. Create a del.icio.us account (see Introduction to del.icio.us). Even if you already have an existing del.icio.us account, creat another one specially for setting up the categories. For the user name, I would suggest using part of the blog's url or title. For example, the user name I selected for doing the categories for this blog is bloggertricks.

2. If you are using FireFox (highly recommended), install the del.icio.us extension with the "My del.icio.us" and "Tag this" buttons (see screen shot below:

Click the "Install extension now" button and follow the instruction. This will install 2 buttons into the toolbar.

3. Click the "My del.icious" button. Confirm that you are logged in. If not, then log in.

4. Surf to the main page (index page) of your blog. At the PREVIOUS POSTS section of the sidebar, click on the very first post. This will take you to the individual post page (permalink) of that post, and the PREVIOUS POSTS will then display the next 10 previous posts. Click the "Tag this" button. A pop-up will open with the url, a description, and boxes for you to enter notes and tags. Enter one-word tags for the category you want that post to be in. If the category is more than 1 word, join them with a hyphen or underscore. For example, for my post entitled "Hiding the navbar", since the post is specific to Blogger, I will tag it with "Blogger-specific" (minus the quotes). You can enter more than 1 tag for each post, the tags just have to be separated by a space. Click [save] when you are done.

5. At the PREVIOUS POSTS section in the sidebar, click the next post, which will take you to the individual post page of that post. Click the "Tag this" button again, and tag that post

6. Repeat for the subsequent post until you have tagged all the posts.

Now, you will have to decide which of the methods you want to use - the Easy Method, or the Simple Method. For an example of the Easy Method, surf over to Natural Remedies to see what it is like. The categories created for this blog Blogger Tips and Tricks is an example of the Simple Method. For the Easy Method, go to step 7. If you want the Simple Method, go to step 9.

Easy Method

7. Click the "My del.icio.us" button. At the top right-hand corner of the My del.icio.us homepage, click HELP, then under BLOG INTEGRATION, click TAG ROLLS. Adjust the settings until the appearance of the tag roll you see in the PREVIEW on the right is what you want. I suggest you change the TITLE to Categories or something suitable.

8. If the appearance of the categories (tag roll) in the preview window on the right is what is desired, click on the code box at the bottom of the page to highlight it, right-click and copy (or ctrl+C). Preferably in another tab or window, sign into Dashboard, select the blog, click the TEMPLATE tab to open the template editor and paste the codes into your template in a suitable place.  Done.

Simple Method

9. Click the "My del.icio.us" button. This will take you to the "homepage" of your del.icio.us account. On the top right corner, you will see the tags you have created.10. Click on one of the tag (for example, BASIC). This will take you the the del.icio.us page that contains all the links to the posts that was tagged with the category BASIC. Highlight the url in the address bar of that page, right-click and copy. In this example, the url will be http://del.icio.us/bloggertricks/basic.

11. Decide on a suitable place where you want the categories displayed . This will normally be in the sidebar. Open a new window (or tab) and sign into Dashboard, select the blog, click the TEMPLATE tab, and in a suitable place in the template, enter the following code:
<h4>CATEGORIES</h4>
<a href="X">A</a><br />
<a href="Y">B</a><br />
<a href="Z">C</a><br />
where X is the url you copied from step 10, and A is the text of the tag, in this example, BASIC.

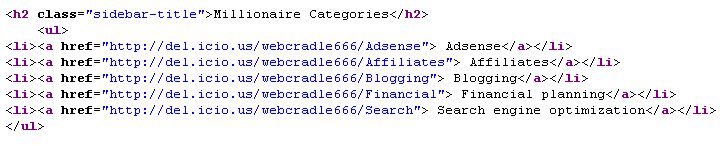
12. In the previous window, go back to the My del.icio.us homepage, click on the next tag. In the above example, it will be BLOGGER-SPECIFIC. At that page containing all the links to the posts that are tagged with that category, again copy the url, replace Y with the url, and B with the second category. In the above example, the codes will become
<h2>CATEGORIES</h2>
<a href="http://del.icio.us/bloggertricks/basic">basic</a>
<a href="Y">B</a>
<a href="Z">C</a>
(Y and B have been left as it is in the above example as putting in the real url will make the code extend beyond the gray box, but I hope you get the idea)

13. Repeat step 12 for the third category

14. If there are more categories, just add more hyperlinks and repeat the steps.

15. When all the categories hyperlinks are done, preview, and if satisfied, save and republish. Done.

0 How to Add content via the template

blogger template 1
blogger template 2
blogger template 3

Content can be added to the blog in 4 ways - via the settings (sign into Dashboard, select blog, click SETTINGS > BASIC, then fill in the box for the TITLE and DESCRIPTION), editing the profile, posting, and via adding stuff to the template. In this post we will deal with the fourth one. What kind of stuff can be added via the template? Text, hyperlinks, images, HTML and javascripts for advertisements, hits counter, guest book, etc. The screenshots above show text added, but adding other stuff should be no problem. In which part of the template you place the stuff will depend on which part of the web page you want the stuff to be in. As a guide, I have added text in various sections of the template, and the positions they appeared are displayed in the screenshots above. The text are in red (and green) and are pretty much self explanatory.
The most common place to add stuff via the template is the sidebar. For this you will have to add the stuff between
<!-- Begin #sidebar -->
<div id="sidebar"><div id="sidebar2">

and
</div></div>
<!-- End #sidebar -->
.
To give you additional navigational aid, there is a button on every blogspot page. Stuff added before or after the following codes
will appear before or after the button respectively.

0 How to copy features from websites you like

You may come across websites or blogs you like, and you will like to have some of the features you see there. What do you do? Well, the idea is to look at the source codes of the website. At the menu bar, click View > Page Source (FireFox) or View > Source (Internet Explorer) and a window will open with the source codes of the site you admire.

For example, I came across a website which has a CATEGORIES section in its sidebar at I want to be a millionaire.


and in the source codes I look for the text Millionaire Categories. The checking turns up this block of codes:


Click on the screenshot to enlarge it

This revealed that the site is just using del.icio.us and hyperlinks to create his CATETORIES section, and it gave me the idea for a simple method for doing categories for my sites, and also is the inspiration for doing the post Blogger Categories: A Simple Method.

0 How to Put the archive links into a menu

If you have been blogging over a long period of time, the list in the archives can get pretty long. You can put the links into a menu to make it more compact. It is pretty straight forward to do. All you have to do is to replace the default archive code with another set of code.

In your template, look for the default archive code which is shown below:

<h2 class="sidebar-title">Archives</h2>
<ul class="archive-list">
<BloggerArchives>
<li><a href="<$BlogArchiveURL$>"><$BlogArchiveName$></a></li>
</BloggerArchives>
delete them, and replace it with these codes:

<select name="archivemenu" onchange=
"document.location.href=this.options[this.selectedIndex].value;">

<option selected>- Archives -</option>

<BloggerArchives>
<option value="<$BlogArchiveURL$>"><$BlogArchiveName$></option>
</BloggerArchives>

</select>
and that is all there is to it. It is done.

Note: I have a nagging suspicion that if this hack is implemented on your blog, you may not be able to backup your blog right up to the beginning with Blog Collector. See How to backup your blog. Also, drop-down menu cannot be read by search engines, so it may not help you in search engine results.

0 How to change the width of the content and the sidebar

This is a common request of bloggers using some of Blogger standard templates when they see wide spaces on either side of the main and side column, like what you will see in this blog if viewed with a large screen. This is to take into consideration those with small screens. If you want to see how this page will display in a 800x600 resolution, type or copy-paste this into the address bar: javascript:top.resizeTo(800,600). You will see what others with small screen see, and there are will wide spaces. If you change the width of the content column and sidebar, it will look different to those with different screen resolution. It may involve a lot of scrolling to see other parts of your blog, and the less patient ones may pass your blog by. Anyway, if you still want to change the width, the instructions are below:

If you want to change the width of the content and the sidebar, you will have to modify the style sheet. This is based on the Blogger Minima template. Look for the following block of codes:

/* Content
----------------------------------------------- */
@media all {
#content {
width:660px;
margin:0 auto;
padding:0;
text-align:left;
}
#main {
width:410px;
float:left;
}
#sidebar {
width:220px;
float:right;
}
}


Note that the sum of the width of the main column (410px) and the sidebar (220px) is less than the total content (660px). You may change the width to whatever you fancy so long as you keep the sum of the width of the sidebar and the main column to be less that the total content. For example, you may change the width of the total content to be 800px, the main column 500px and the sidebar 270px, and your style sheet will become as follows:

/* Content
----------------------------------------------- */
@media all {
#content {
width:800px;
margin:0 auto;
padding:0;
text-align:left;
}
#main {
width:500px;
float:left;
}
#sidebar {
width:270px;
float:right;
}
}


You may also want to change the width of the header as well, as follows:

/* Header
----------------------------------------------- */
@media all {
#header {
width:800px;
margin:0 auto 10px;
border:1px solid #ccc;
}
}


BTW, if you want to see the effect that this change will have on viewers with 800X600 screen resolution, you can type javascript:top.resizeTo(800,600) into the address bar to resize the window to 800x600.

Reminder: Always backup the template before you make any changes to it.

0 How to make permalink more prominent

What is a permalink?

If you have enabled POST PAGE, then each individual post of your blog will have an individual post page with its own URL. If you are using the default settings for your blog, you will see at the bottom of every posts a line "Posted by (author) at (time stamp)" as illustrated in the screen capture below:

If you let your mouse hover over the time stamp, a pop-up will appear with the text "Permanent Link", and if you click on the time stamp, you will be redirected to the individual page of the post. This is good for your blog as people who want to refer (and link) to this particular post will be able to do so. However, this default setting have the disadvantage that the permalink is not prominent and is not easily noticed. Many are not even aware that the time stamp is a permalink. There is an easy way for you to make the permalink more noticible by adding the text "PERMALINK", as shown in the screenshot below:

To do this, you will have to look for this block of codes in your template:

<a href="<$BlogItemPermalinkUrl$>" title="permanent link"><$BlogItemDateTime$></a>
and add the text PERMALINK after <$BlogItemDateTime$>, like this:

<a href="<$BlogItemPermalinkUrl$>" title="permanent link"><$BlogItemDateTime$> PERMALINK</a>

0 Blogger (classic template) Expandable Post Summary

What is Expandable Post Summary?

You may be in the habit of creating long posts, and your readers have to scroll and scroll to get to the next post in the main or archive section. You don't want that. You want only to have the first few lines of the post visible, followed by a READ MORE hyperlink that takes you to the full post. That is expandable post summary.

How to do expandable post summary for Blogger

First, you have to ensure that you have POST PAGE enabled. Go to SETTINGS > ARCHIVING and make sure that ENABLE POST PAGES? is set to YES. Then paste the following codes into your CSS (Cascading Style Sheet. It will be the section between the <style> and the </style> tags in beginning of your template.) (Important note: It is always advisable to backup the template before you do any modification to it.)

<MainOrArchivePage>
span.fullpost {display:none;}
</MainOrArchivePage>

<ItemPage>
span.fullpost {display:inline;}
</ItemPage>

Then add the following codes in the template just after the <$BlogItemBody$> tag

<MainOrArchivePage><br />
<a href="<$BlogItemPermalinkURL$>">Read more!</a>
</MainOrArchivePage>

You can replace the anchor text Read more! with Read the rest of the post... or whatever you fancy.

The next thing you have to do is to place some pieces of codes in your post. Put the tag <span class="fullpost"> at the spot where you want your long post to be truncated, then type in the rest of the post. At the end of the post, add the tag </span>. Thus your post may be typed as follows:

This is the beginning of a long post, which is truncated here. <span class="fullpost"> This is the rest of the long, long post. </span>
If you don't want to have to type in the codes by hand each time you do a post, you can add the codes in the post template by going to SETTINGS > FORMATTING and at the bottom of the page, in the POST TEMPLATE box, add in the codes <span class="fullpost"></span>. Just make sure that the text are typed in the proper place.
 

Get Everthing Copyright © 2011 - |- Template created by O Pregador - |- Powered by Blogger Templates